ප්ලාස්ටර් කිරීමේ නිවැරදි තාක්ෂණය
(Wall Plastering Process): Guide to Smooth, Crack-Free Walls
Plastering is the critical finishing stage that bridges structural masonry and final painting. Beyond providing a clean, aesthetic finish, a well-executed layer of plaster protects raw brickwork or block walls from moisture penetration, weathering, and structural deterioration.
In this guide, we break down the step-by-step wall plastering process based on the construction standards followed by
Why Proper Plastering is Essential
Improper plastering technique leads to widespread issues like hollow sounds, surface flaking, diagonal shrinkage cracks, and dampness on interior walls. A high-quality plaster application ensures:
-
Smooth & Flat Surfaces: Corrects minor wall deviations to reduce putty and paint usage.
-
Weather Resistance: Seals porous bricks and blocks against rainwater penetration.
-
Long-Term Durability: Prevents salt attack (efflorescence) and surface cracking.
Step-by-Step Wall Plastering Process
Step 1: Surface Preparation (තල මතුපිට සූදානම් කිරීම)
-
Cleaning: Remove dust, oil, loose mortar protrusions, and efflorescence from the wall using a wire brush.
-
Joint Raking & Hacking: Rake mortar joints back slightly to provide a mechanical key. Concrete surfaces (columns, beams, slab soffits) must be hacked thoroughly or treated with a bonding agent (spatter dash/hack coat) so the plaster sticks effectively.
-
Wetting: Wet the brick/block wall adequately before applying plaster. Dry masonry absorbs water directly out of the fresh plaster mortar, causing rapid drying and shrinkage cracks.
Step 2: Fixing Mesh over Joints (ජොයින්ට් වලට මෙෂ් තැබීම)
-
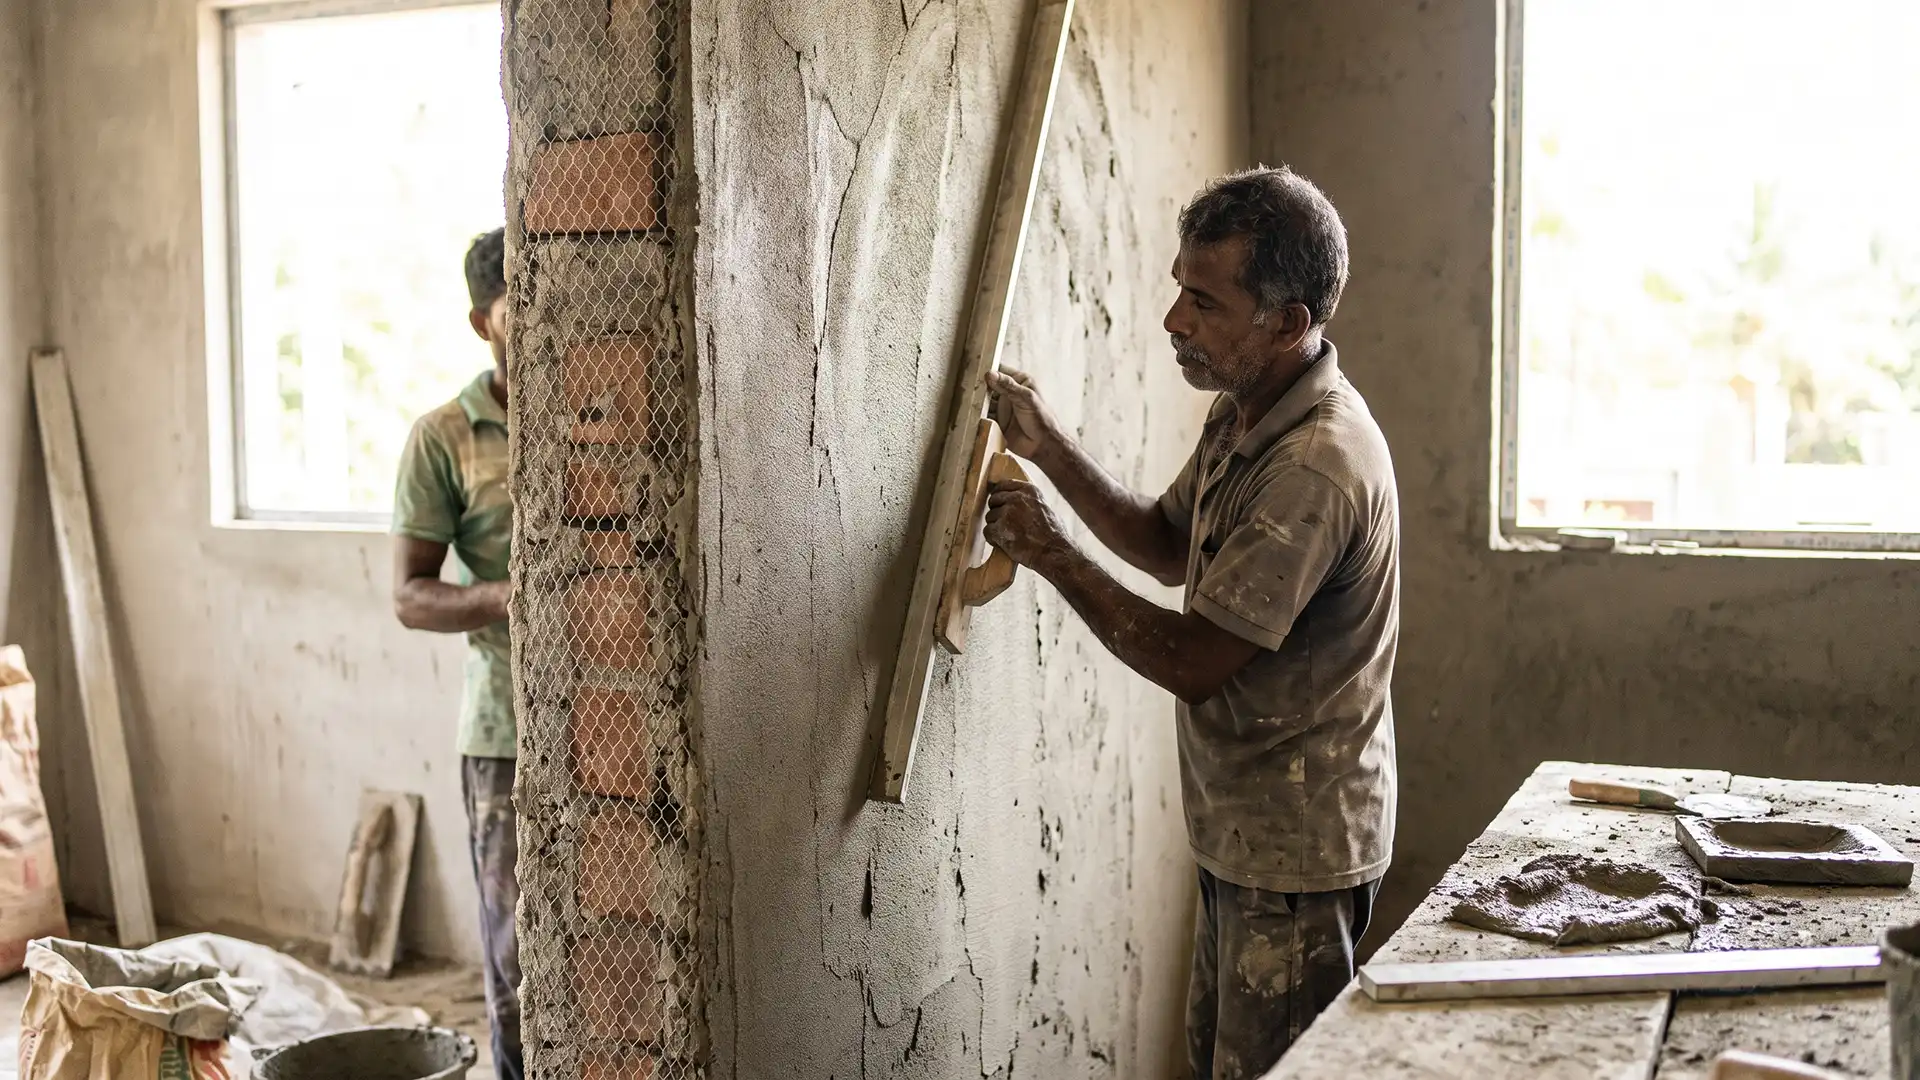
Where brickwork or blockwork meets concrete columns and beams, install a strip of chicken mesh (fiberglass or metal mesh) across the joint before plastering. This prevents structural expansion cracks from appearing along wall-column junctions.
Step 3: Mortar Preparation & Mixing Ratio (බදාම මිශ්රණය)
-
Internal Plaster: Typically utilizes a 1:5 or 1:6 cement-to-sieved sand ratio.
-
External Plaster: Requires a richer 1:4 ratio for enhanced water resistance, often combined with a waterproofing additive.
-
Sand Quality: Sand must be properly sieved to remove stones and organic contaminants.
Step 4: Leveling & Applying Gauge Dots (ලෙවල් බැලීම සහ බෝල තැබීම)
-
Apply small mortar pads (gauge dots/button marks) at regular intervals across the wall and check them using a plumb bob and spirit level.
-
Apply the scratch coat or base coat between these points using a steel trowel, then level it smoothly using an aluminum straight edge (අලුමිනියම් පටිය).
Step 5: Surface Finishing & Curing (වැඩ නිමකිරීම සහ වතුර දැමීම)
-
Use a wooden float or sponge float to achieve the desired texture (smooth finish or rough sponge finish).
-
Curing: Once the plaster sets, keep the surface moist by spraying water daily for at least 7 days. Proper curing is critical to achieve full compressive strength and prevent micro-cracking.
Watch the Full Video Guide
To see the plastering technique, mortar preparation, and leveling methods demonstrated step-by-step on a live Sri Lankan construction site, watch the video on YouTube:
Build Your Dream Home with Lions Home Lanka
At Lions Home Lanka, our experienced engineering and masonry teams ensure that every stage—from foundation work to smooth wall plastering—is completed to the highest standards.
Contact us today to start building your dream home with confidence!
📞 Contact Details:
-
Office Address: No.576/1, Kadawatha, Sri Lanka.
-
Phone / WhatsApp:
+94 72 7 637 500 -
Email:
info@lionshome.lk -
Official Website:
Lions Home Lanka